Travelers, tourists, explorers. Amateurs and professionals alike, anyone who loves traveling hopes to capture amazing photos during their journey.
You don’t need to have professional equipment and a team to get spectacular shots. All you need to have is a smartphone, your creativity, and a few add-ons.
Outdoor photography is the favorite among most photographers due to the variety of subjects that can be captured. Today, we have written about the main equipment and tips for a complete smartphone outdoor photography guide. Let’s jump right in!
Smartphone Outdoor Photography Equipment
The reason has always been hard to explain, but we are fascinated by the beautiful images of the world around us. It becomes essential for a photographer to interpret these scenes, capture them, and then share them with a wider audience. We hope by doing so to communicate to everyone the same sensations that we have experienced.
Outdoor photos with your mobile phone present several technical challenges. You’ll have less control over the scene as opposed to indoor photography. On the other hand, outdoor photos can give us access to a wider range of subjects.
Smartphone standard setup, even though improved over recent years, is far from being a total solution. A classic example would be smartphone zoom distortion, losing definition as it magnifies the subject. According to the situation, we can use mobile lens kits to enhance our phone picture quality. Here, we will present the main type of lenses.

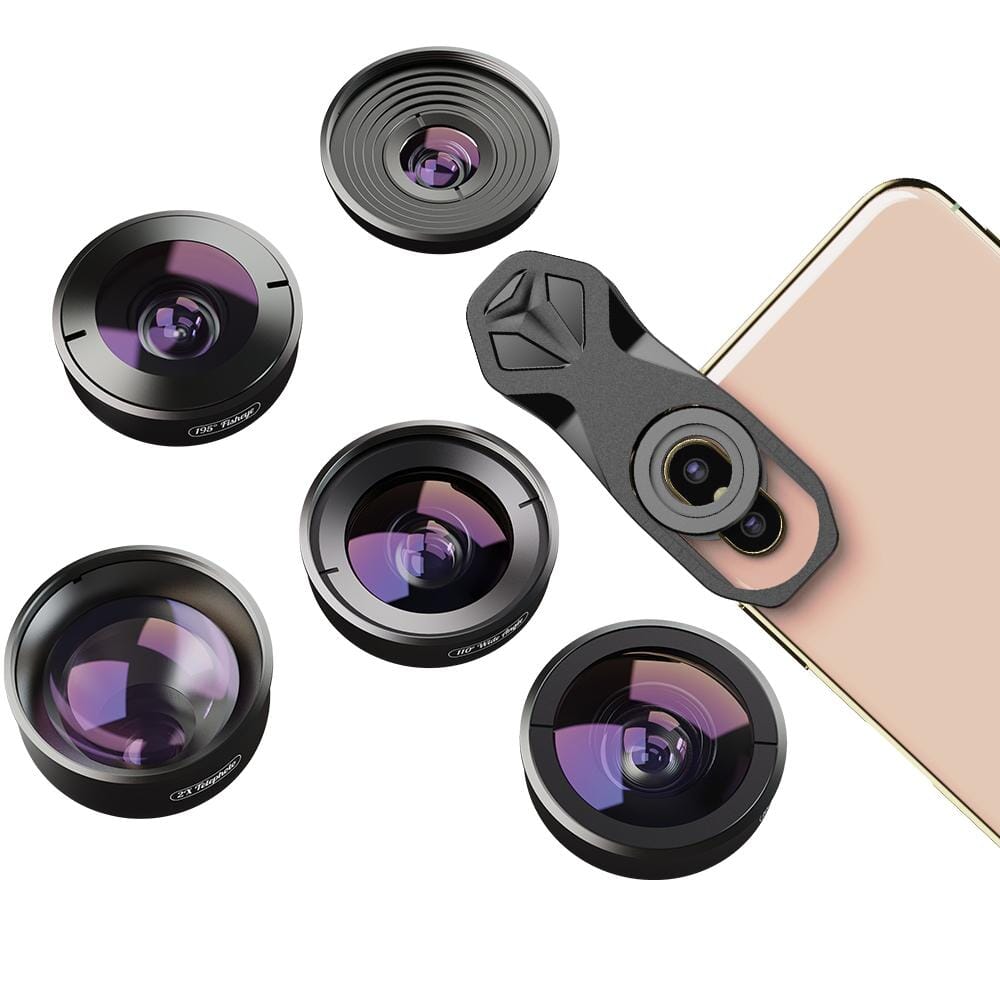
1. Mobile wide-angle lens
Talking about outdoor photography, the first type of lenses that comes to mind is the wide-angle lenses. A wide-angle lens has a shorter focal length than a normal lens (shorter than 35mm). This type of lens is useful for photographing large portions of the scene and is therefore widely used for landscape photos.
When capturing landscape pictures, photographers may not be able to move away from the scene. With smartphone wide-angle lenses, we can capture the scenery in its entirety. A wide-angle is not recommended for portrait photography as proximity to the subject deforms the face.
The wide-angle lenses can also emphasize the difference in size or distance between objects in the foreground and the background. In a nutshell, close objects appear very large, while distant objects appear smaller and more distant than they actually are.
A superb exponent of this category of lenses is the Apexel 110 Degree Wide Angle Lens. Besides achieving 110-degree angle coverage, the cinema-grade glass design makes this lens provide increased depth of field. The result is an astonishing high image quality.
A separate mention deserves the ultra-wide-angle lenses called fisheye. The smartphone fisheye lens has a general focal length equal to or less than 16mm and an angle of view not less than 180 °. At Apexel, we went one step further with our HD 195 Degree Super Fisheye Lens.
One of the peculiarities of this kind of lens is the curving lines. The final result is a deformation of the picture, which strongly characterizes it and constitutes its true identity. Photographers take advantage of the distortion produced by the lenses to achieve new artistic effects.

2. Mobile telephoto lens
Have you ever been amazed by wildlife shots? Lions, tigers, or our neighbor bad-tempered dog. For all of these pictures and more, the answer is the smartphone telephoto lens.
The telephoto lens allows you to photograph a distant subject or to enlarge it within our image. Although it lets us capture elements far away from us, this does not mean that the effect is identical to getting closer to the subject. The amazing thing about these optics is the effect of “compression of the planes.” Basically, they make the distances between various framed objects less evident, “squeezing” them towards each other. Because of this property, the telephoto lenses have a narrow view, separating distant objects from the background.
A telephoto lens has a longer focal length than normal lenses, so all optics over 50mm are considered telephoto. Universal Clip 2x Portrait Telephoto Lens for iPhone is perfect for taking photos of wildlife and portrait. The glasses offer a 2x magnification of the subject without deforming the image for a crisp and sharp result.

3. Mobile macro lens
A smartphone macro lens is characterized by high sharpness imaging at the low minimum focus distance.
These lenses are used to obtain a reproduction ratio of the subject equal to or greater than 1 (≥ 1: 1). In general, macro lenses have a low minimum focus distance from the subject, about half of that possible with a normal lens, but it is not fixed and varies according to the lens.
Macro lenses are used differently in macro photography depending on focal lengths:
From 45mm to 65mm – photography of products and small objects.
90mm to 105mm – insects, flowers, and small objects from a comfortable distance.
With Apexel HD 100mm Super Macro Lens, you can highlight each detail about your tiny subject. Compared with the ordinary macro lens, our solution has a larger aperture to provide a natural blur effect. These optics allow keeping more distance from the subject while still having a high definition of the image.
For more information about smartphone macro lens, check out our guide: How to Capture Stunning Macro Photos With Mobile Camera Lens.

4. Night Vision Binoculars
Night vision binoculars are the best companions for those who like taking pictures of animals. Among the gear often used by wildlife photographers, we can always find reliable binoculars. The device makes it possible to spot animals half-hidden by the flora even at night.
For the intrepid explorers (who do not fear darkness), Apexel has developed the new 1080P Night Vision Binoculars Telescope. The digital vision google can provide crisp vision zoomed x6 times (optical 2X, digital 4X). No matter the conditions, the device enables to spot the subject anywhere and at any time. The device provides for large viewing distance during daylight and at night in complete darkness ( infrared light).
To know more about night vision, check out our guide: Night Vision vs. Thermal Imaging.
5. Smartphone tripods & camera rigs
Many people see these tools as an unnecessary luxury. They couldn’t be more wrong. Tripods and other tools such as camera rigs are crucial to dampen and eliminate the micro-vibrations generated when you try to shoot freehand.
Both for still or moving targets, the tripods can assure better image results. Especially, they are used for taking outdoor photos in adverse conditions (windy and rainy days). For us photographers, these tools are something we always double-check to have before going out for our photographic trip.

Outdoor Photography Tips
1. Light makes the difference
We’ll always repeat it: photographing means writing with light. Therefore light represents the main medium through which to express our photographic talent.
A beautiful landscape taken in flat light produces a shot that is best forgotten. The best light for outdoor photos is that of the early morning. Suppose you feel more romantic, the hour before sunset can be a good pick too. Usually, professionals of outdoor photography prepare a few early risings at dawn and some cold dinners. Why do we choose this particular time?
During these two windows of time, the light softens and better envelops the scene. The sun, low on the horizon, offers a grazing light that draws the scene’s elements with long shadows and bright areas. In the morning and evening, the light loses the aggressiveness typical of the day’s central hours, with the sun shining on the various elements.
By saying this, we do not mean it is forbidden to shoot landscapes between 10 am and 5 pm. Our is just a tip for the best results. During the day, you will need to calculate the exposure better.
2. Balance the white
It is highly probable that when taking outdoor photos with your smartphone, there are different lights. Lights can cause a disturbance in the photo colors, an interference that every good camera tries to remedy by resorting to white balance.
In this regard, we suggest not to rely on the automatic setup. In fact, we recommend that you take care of it personally, using the manual mode. For “anomalous” light conditions, such as the sunset light, the mobile phone camera goes crazy and completely bust your color balance.
Instead of using the auto white balance mode, try setting the shadow or cloudy sky mode when taking landscape pictures. The photo will tend to have a “warm” dominant result, which is preferred to a “cold” effect.
3. Perspective composition
There is no camera capable of rendering perspective as the human eye perceives it. To get the sense of depth that makes your photo-realistic and three-dimensional, you’ll need to focus on the foreground.
For example, if you are photographing a hilly landscape, the best way to maximize the environment’s depth will be to focus on the foreground subject, such as the flowers. This will increase the perception of the distance between the foreground object and the rest of the scene.
An important rule to consider here is the “rule of the thirds.”
What is the rule of thirds? Well, it’s a simple rule that helps you avoid the risk of taking trivial photos. You will have to mentally divide your camera’s viewfinder into a grid formed by two horizontal and two vertical lines, equidistant from each other (your field will be divided into nine equal parts).
At this point, all you need to do is make sure that the main subject of your shot is along with one of the lines or on one of the intersection points. For smartphone outdoor photography is good to remember this simple rule. It is also handy for deciding which element you want to give more prominence to.
4. Focus & Depth of field
As a rule, your camera will tend to focus on the closest or predominant subjects. This practice cannot be ideal if the object you want to immortalize is not the nearest to you.
Unless we have embarked on some extremely creative project, canonical landscape photography requires that the portrayed elements focus on both foreground and background.
Let’s get used to working with small apertures that guarantee us everything is in focus. Once achieved the right setup, you should never go below. Even though mobile lenses have a preferred aperture, we usually set it between f./8 and f./16. (recommended f./11)
Smartphone Outdoor Advantages
Professionals camera has many pros. Nonetheless, smartphone photography for outdoor has distinct advantages. Smartphones have the largest viewfinder of all cameras. Furthermore, your phone with add-ons can be turned in a real studio. Photos can be edited, stored, and shared online. You can check the quality of the picture right away.
At Apexel, we believe that the secret to capturing awesome pictures can be in everybody’s pocket. That’s why since 2003, we have been helping photographers and amateurs worldwide expressing their creativity through mobile lenses.
Hopefully, this outdoor photography guide for beginners provided you with useful knowledge. Check out our new solution for outdoor photography!
Share:
How to Choose the Right Smartphone Zoom Lens?
The Complete Guide to Binoculars