This article is the result of questions and requests that I often receive from people who participate in my photo tours and workshops. The problem is photography with a mobile phone and how to take better photos with this handy device.
So, here are a few quick mobile photography tips that apply to ANY camera, which will help you improve the picture of your phone.
Come closer, do not zoom - #1
This is a two-part tip, but both occur simultaneously. The best thing to do to improve your mobile phone's photography is to get closer to the subject without using the built-in zoom. This means that you will need to move your ass! I also speak of approaching to simplify his image. Less is more!

The first image shot too far away.

This second image was taken a few centimeters from the flower and this beautiful mellichon bee also posed for me!
This is a two-part tip, but both occur simultaneously. The best thing to do to improve your mobile phone's photography is to get closer to the subject without using the built-in zoom. This means that you will need to move your ass! I also speak of approaching to simplify his image. Less is more!
The first image shot too far away.
This second image was taken a few centimeters from the flower and this beautiful mellichon bee also posed for me!
Get out of your chair and get physically close to the subject. So many phone jacks I see are too far away and the subject has been lost. This is partly because the phone has a very wide-angle lens.
The reason you do not want to use the camera zoom is that the image quality will be greatly affected. It's good for a snapshot of your sleeping cat in a fun place, but when you want to create better pictures, avoid using the zoom.
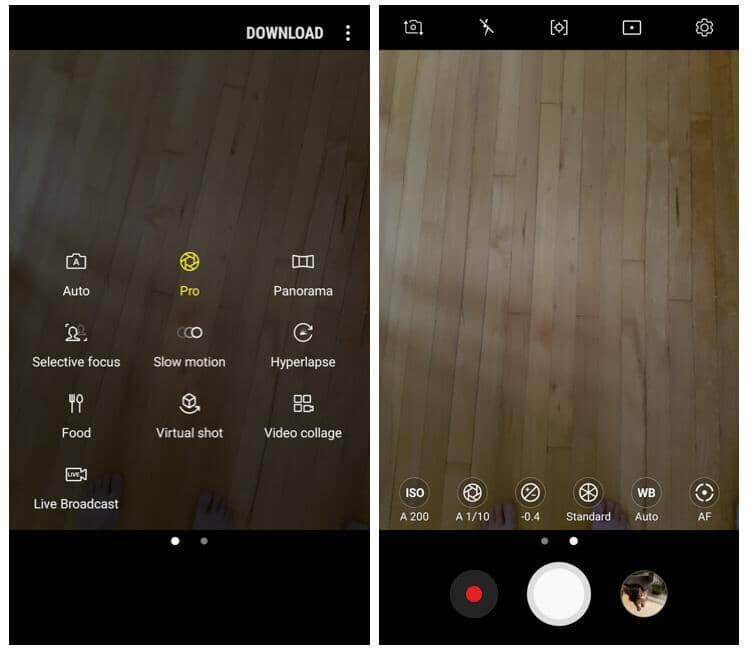
Use Camera App - #2
Some mobile phones have a Pro feature built into the camera. I have a Samsung S8 and this option is easily accessible if you scan the camera left with the camera open. If your phone does not have this feature, look for an app that supports this template.

This is what the Pro Camera app looks like on my phone. On the right side, you can see the image I can adjust (in order from left to right): ISO, Shutter speed, Add exposure compensation (-0.4 is displayed here), Image style (Powerful, Fade, etc.), White balance and focus mode.
What you want is an application that lets you choose the settings of your camera like a digital SLR camera. such as iris selection, white balance, and exposure compensation. Look at the reviews and ratings and try some until you find one that you like.
Keep the phone stable or use a tripod - #3
A big problem with many cell phone pictures is that they are blurry. This is mostly due to a lack of stability during recording. So get a tripod or a device that will help you keep the phone steady. If you do not have one, be sure to keep your elbows in place during shooting to minimize camera shake.
The tripod you have for your main camera is too big for a phone, so look for a smaller one designed for mobile devices.
Clean the lens - #4
I can not count the number of times I have told friends, relatives, and strangers to clean the phone on the phone. This is a handheld device, your fingers and your fingerprints are everywhere. It is exposed to daily dirt and grime and can even be knocked over or stored in a puddle of coffee on the table.
If your lens is dirty, your image will be affected significantly and may become blurred. This can even lead to a lens effect or the complete foggy photo effect. Run this test to check your camera.
Take a very bright picture, such as the sun, a lamppost or a lamp in your house. If the image is blurry and fuzzy, you must clean the lens! Use a microfiber cloth as for normal lenses and be careful not to scratch it. Do not forget to do the same for the front camera so that your selfies are spicy!
Watch the background - #5
This tip refers to the last one, as it is also part of the composition. When photographing, do not forget to look at the background. I think cell phones are too easy to take pictures too fast and not to think too much before the button is pressed.

I placed the flower out of center here to create a more interesting composition. But the background is very busy and distracting. So. ,,

Then I follow the first tip # 1 and get closer to this picture, which I think is much stronger. Note that the center of the flower in the above picture is still off-center?
Slow down, take your time, take a picture and look at the picture. Pay special attention to the background. Is there anything distracting that you could eliminate by adjusting the angle of your camera?
Look at the edges of the frame and do the same thing. Is there anything that goes beyond stitches in the frame that does not need to be there? If so, then get rid of it! Move closer or reposition yourself and take another picture.
Focus - #6
Select the focus point yourself. Depending on your phone and model, you may be able to touch the screen on which you want the camera to focus. If you have this feature, use it! Do not let the camera choose where to focus, as this may cause an error.
If manual focus is an option (in my Pro Camera application), you can also try. However, it is difficult to say when something is in focus. Personally, I do not use it for phone photography. I just touched the screen where he is supposed to be strong.

The cat photo was taken with a smartphone. I concentrated on this picture by tapping on my screen here.
Process your pictures - #7
Image processing is a discussion that often occurs in relation to all photography. Is it right to process it? That's a long debate, but you must IF you want. Nevertheless, I highly recommend it!
If you're not working on a large camera, start with your mobile photography. It's super easy and you can not mess anything up. Just get my favorite photo app (Snapseed) for Android or iPhone.

This is the original image, directly from the phone.

Treated with Snapseed. I added contrast, a contour attenuation thumbnail, and improved detail and texture (sharpness).

Here is a black and white version, also made with Snapseed. It is a very nice application.
The reason you do not want to use the camera zoom is that the image quality will be greatly affected. It's good for a snapshot of your sleeping cat in a fun place, but when you want to create better pictures, avoid using the zoom.
Use Camera App - #2
Some mobile phones have a Pro feature built into the camera. I have a Samsung S8 and this option is easily accessible if you scan the camera left with the camera open. If your phone does not have this feature, look for an app that supports this template.
This is what the Pro Camera app looks like on my phone. On the right side, you can see the image I can adjust (in order from left to right): ISO, Shutter speed, Add exposure compensation (-0.4 is displayed here), Image style (Powerful, Fade, etc.), White balance and focus mode.
What you want is an application that lets you choose the settings of your camera like a digital SLR camera. such as iris selection, white balance, and exposure compensation. Look at the reviews and ratings and try some until you find one that you like.
Keep the phone stable or use a tripod - #3
A big problem with many cell phone pictures is that they are blurry. This is mostly due to a lack of stability during recording. So get a tripod or a device that will help you keep the phone steady. If you do not have one, be sure to keep your elbows in place during shooting to minimize camera shake.
The tripod you have for your main camera is too big for a phone, so look for a smaller one designed for mobile devices.
Clean the lens - #4
I can not count the number of times I have told friends, relatives, and strangers to clean the phone on the phone. This is a handheld device, your fingers and your fingerprints are everywhere. It is exposed to daily dirt and grime and can even be knocked over or stored in a puddle of coffee on the table.
If your lens is dirty, your image will be affected significantly and may become blurred. This can even lead to a lens effect or the complete foggy photo effect. Run this test to check your camera.
Take a very bright picture, such as the sun, a lamppost or a lamp in your house. If the image is blurry and fuzzy, you must clean the lens! Use a microfiber cloth as for normal lenses and be careful not to scratch it. Do not forget to do the same for the front camera so that your selfies are spicy!
Watch the background - #5
This tip refers to the last one, as it is also part of the composition. When photographing, do not forget to look at the background. I think cell phones are too easy to take pictures too fast and not to think too much before the button is pressed.
I placed the flower out of center here to create a more interesting composition. But the background is very busy and distracting. So. ,,
Then I follow the first tip # 1 and get closer to this picture, which I think is much stronger. Note that the center of the flower in the above picture is still off-center?
Slow down, take your time, take a picture and look at the picture. Pay special attention to the background. Is there anything distracting that you could eliminate by adjusting the angle of your camera?
Look at the edges of the frame and do the same thing. Is there anything that goes beyond stitches in the frame that does not need to be there? If so, then get rid of it! Move closer or reposition yourself and take another picture.
Focus - #6
Select the focus point yourself. Depending on your phone and model, you may be able to touch the screen on which you want the camera to focus. If you have this feature, use it! Do not let the camera choose where to focus, as this may cause an error.
If manual focus is an option (in my Pro Camera application), you can also try. However, it is difficult to say when something is in focus. Personally, I do not use it for phone photography. I just touched the screen where he is supposed to be strong.
The cat photo was taken with a smartphone. I concentrated on this picture by tapping on my screen here.
Process your pictures - #7
Image processing is a discussion that often occurs in relation to all photography. Is it right to process it? That's a long debate, but you must IF you want. Nevertheless, I highly recommend it!
If you're not working on a large camera, start with your mobile photography. It's super easy and you can not mess anything up. Just get my favorite photo app (Snapseed) for Android or iPhone.
This is the original image, directly from the phone.
Treated with Snapseed. I added contrast, a contour attenuation thumbnail, and improved detail and texture (sharpness).
Here is a black and white version, also made with Snapseed. It is a very nice application.
Personally, I find it very funny to play with Snapseed with my pictures. It's a great way to pass the time if you're traveling somewhere (if you're not driving!) Or even waiting in the supermarket. Get creative and try all the filters to see what they are doing. Playing well is a great way to find your own style and see what you like and do not like about the look of your pictures.
With my Fuji cameras, I can even upload a JPG file of a picture of my choice and transfer it to Snapseed. In addition, I can edit some of my classic camera images immediately and publish them on social media. I often do it when I'm on the road. If your camera has Wi-Fi and an app, you probably can!

It's actually my husband's photo taken with his Google Nexus 6P phone. This is untreated.

I grabbed the picture and treated it with Snapseed. Is not it really getting it now?
Find good light - #8
If you've been reading my articles here for a while, you know I'm passionate about good light. But what is it and how do you use it for the photography of your phone? Here are some simple ideas to get you started.
First, try to enlighten your subject. This will give you a dynamic look to the image with a sunny outline around your subject or create a silhouette.

The backlight here really brings out the color and brings out the veins of the leaves. The foliage and flowers look great to be backlit.

Another backlit plant in our garden. You can make really simple motives with the right lighting to sing.
Second, look for side lighting or cross-light on your subject. The incident light on the side brings out the texture of the subject and adds depth and dimension to your photos. It's one thing for the subject to have a texture, it's another thing for you to highlight it and highlight it on the image. The soft, flat light makes the bumpiest and knotty tree bark appear in two dimensions.

Lateral lighting brings out the texture of this squash leaf. Who knew they were so pretty ?!
Finally, use 5 shadowing tips to create dramatic images to your advantage. Do not try to eliminate them or take pictures without shading, this would give the image an appearance and a feeling of flatness. Instead, work with the shadows.
Turn off the HDR setting - #9
Some cameras offer HDR setting. Turn it off! Or at least, use it sparingly. You do not need it about 90% of the time.
I use HDR for high contrast shooting and want a little more detail in the shadows and highlights. However, I suggest taking two different pictures. one with HDR function and the other without.
OR avoid shooting with contrasting lighting. Check back later in the evening for the blue hour or shoot in the shade if these are options for you. The goal here is to choose your battles. I took the pictures above while we went out for a walk in the afternoon. If I wanted to do a very good job on this plan, I would come back to sunset, but in this situation, the HDR mode is appropriate.

Here is a contrasted scene was taken using the HDR mode of the camera.

The HDR mode is activated. He has really done very good details.

Here, the same image (the non-HDR image) is processed for comparison with Lightroom. There are better details, but the picture in HDR mode (above) is pretty good.
Adjust the exposure - #10
If you are using a Pro Camera app, you should set the exposure and make the image darker or lighter during shooting. For some cameras, you can do this in automatic mode. Mine does this by touching the screen and moving a light slider up or down.
Just as with an SLR camera or a mirrorless camera, you control the exposure and image of your image in this way. If you want to create a bright and airy image, brighten it up. However, if you want to be dark and moody, reduce the exposure. The choice is yours, not the camera.
Turn off the flash - #11
This is closely related to the point above. Whenever the light comes directly from the angle of the camera, it flattens the features and texture of the subject. This is what creates red eyes and deer in the headlights look undesirable. The same goes for your built-in flash on your usual big camera!
The size of the light source also counts, and harder the light wants to be and the less interesting. So, using the flash on your phone is almost never a good idea. If you need more light, get a flashlight or have a friend use the light on your phone to add light to the scene - aside!

Shot using only natural light. It was past sunset and the camera was using ISO 1250 and f / 1.7 here, so there's a lot of noise/grain in the picture. This one was treated in Lightroom to eliminate the noise.

This is the case when I activated the flash and used the automatic mode of the camera. There is NO treatment, it comes directly from the camera. The camera used f / 1.7 again, but this time at ISO 50, so all the lighting in this image comes directly from the camera's small flash.

In this picture, my husband uses the flashlight on his phone to add lateral light to the flower. The camera settings were again at ISO 200, f / 1.7. Similar to the picture above, all the lighting comes from the flashlight. It comes from the side, not the angle of the camera, there are more texture and details in the background.
So, turn off the flash and use it only when you have no other option. But you want to realize and accept that photo.
Here is another example of with and without flash.

Without the flash.
 With the lightning See how everything is completely extinguished and a black void emerged. Not what I wanted.
Conclusion
Phew, I said it was quick tips, right? I can not help it, I start to explain and talk. At the end of the day, I hope these tips will help you and that you can try and try them out.
So grab Snapseed and install it on your phone now. If other photo editing apps look good, try them too. Tell us about it in the comments, if you find good, and also share your pictures!
Photographing with a mobile phone is a great way to play and experiment. Try different lighting scenarios, try different filters and treatments, and see what's right for you. Remember that photography is a journey, not a destination. Whether you arrive with a DSLR, a camera without a mirror or a smartphone, enjoy the journey!
Share:
This Mom Uses Her iPhone Camera to Transform Her Travels Into Art